|
Search: |
|
Search: |
HOME → ARTICLES → ARTICLE: DIE HEATING & COATING

President
CMH Manufacturing Company
www.cmhmfg.com
The die should be heated to 600° F (315° C), and care must be taken to heat the die uniformly. A magnetic thermometer, optical pyrometer, or a temple stick should be used to check the temperature periodically. The die should dry-ice blasted to remove any soot that developed. Spray the die lightly with water. This will create a porous oxide film on the die, which will provide a good surface for the die coating to bond.
The water spray also cools the die to the desired coating application temperature, 350°-400° F (75°-200° C). If the die is too hot, the rapidly expanding water vapor front moving away from the die will cause a phenomenon known as “kick back,” and very little coating will adhere to the die. Even the coating that does adhere will not be properly bonded. If the die is too cold the coating might run, resulting in an uneven surface.
Extend the ejector pins. While the die is still above 300° F (150° C), spray the extended ends of the ejector pins with HALLCoat986 or comparable graphite die coating spray. Retract the ejector pins back into the die and dry-ice blast the die face to remove all graphite die coating from the die face, as the primer coat will not adhere to the graphite.
Now the die is ready to prime. The purpose of the primer coat is to create the best possible adherence of the coating to the die. This occurs because very diluted sodium-silicate solutions allow bonds to form that are more parallel to the die face. This structure forms a stronger bond, which is more resistant to wear. In contrast, high sodium-silicate solutions create bonds that are perpendicular to the die face and can be sheared away. Care must be taken not to over dilute the primer coating as sufficient sodium silicate must be present generate the bond.
Once the primer is applied, the main coating can be applied at higher concentrations. Thoroughly stir the HALLCoat 520RH die coating or comparable coating. Transfer the mixed coating into the spray gun can and dilute 6:1 with clean water. Spray the entire cavity, including gates, risers, and pouring cup, with a light primer coat. Avoid spaying the parting line.
The next step is die coating. Place a small amount of the die coating in the spray pot. Dilute to a ratio of approximately 2:1. After diluting, place a small amount of coating in a Baume beaker and place a Baume gage in the beaker. The Baume reading should be between 22-26.
Spray the entire cavity, gates, and riser, avoiding the parting face. Do not try to cover the cavity with one heavy coating. A gradual build-up of the coating is preferred over one heavy coat. The number of coats and the exact coating thickness will vary with the casting design and may vary within the die itself. Check the coating thickness with a Posi-Pen. A working profile should be developed for areas that require a heavier or thinner application of coating to aid solidification. A coating thickness of 10-20 mils is typical. After the coating has cured, excess coating should be removed from the parting line and core prints with a wire brush or brass scraper.
The final step is to paint the gating risers, and pouring cup. A softer highly isolative coating is required, such as HALLCoat600, or equivalent. The coating should be brushed on the desired surfaces with a soft paint bush. The process should be repeated until the coating is the thickness of a dime.
Isolated heavy sections in the die will require “trimming.” The next step is to remove or thin the coating in the areas that require rapid solidification. This can be done with a brass scraper, steel wool, or a wire brush mounted in a die grinder. After trimming, the exposed steel should be sprayed with HALLCoat986, or equivalent to prevent aluminum from welding to the steel die. Now, the die should be reheated to pouring temperature approximately 800° F.
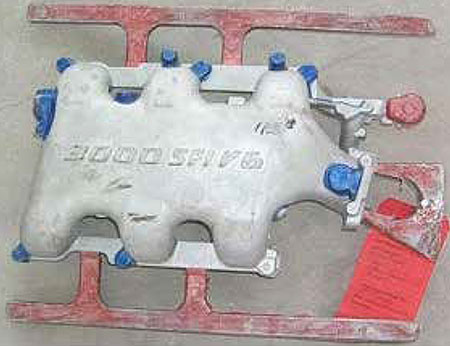
Once the coating procedure for a particular casting is finalized the method must be recorded for future reference. One method is to mark a sample casting with paint. In the attached photo, the unpainted areas have a standard coating, the blue painted areas are trimmed and coated with graphite coating, and the red painted runners and risers are coated with HALLCoat600 isolative coating or equivalent.
Most commercial die coating materials are bonded by sodium silicate with various filler materials for their isolative, lubricating, or cosmetic qualities. Die coating is supplied in 5-gal. cans or 55-gal. drums. The coatings should be stored in their original covered containers with the lids firmly in place when not in use. Die coating should be stored in a dry place away from excessive heat or cold, or drastic temperature change. Ideal storage temperatures range from 50° -75° F (10°-25° C). Under no circumstances should the coating material be allowed to freeze, as subsequent thawing may not restore the coating to its original condition. Refer to the manufacturer’s instructions for additional storage information.
Touching up a die while in use follows much the process as preparing a new die, but some extra rules must be used. Make sure any sheared or welded-on aluminum is removed before adding the touch-up coat. If the coating area is spalled, cracked, or blistered, be sure to remove it with sandpaper, steel wool, brass brush or brass scraper.
Check back
soon for more
information.
Privacy Policy and Terms and Conditions.
Copyright © CMH Manufacturing Gravity Die Casting Machines. Web published by Marketing Options, LLC